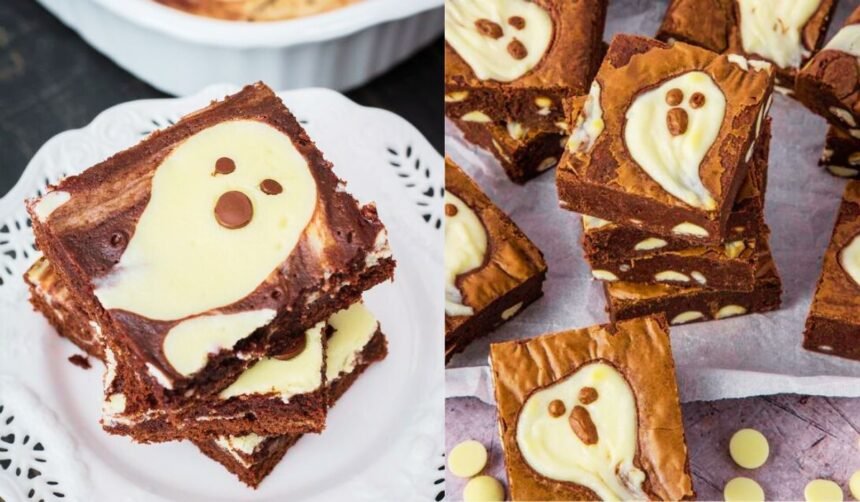
Halloween is right around the corner, and what better way to celebrate than with a creepy yet delicious dessert! These ghost cheesecake brownies are sure to be a hit at your Halloween party or for trick-or-treaters.
The brownie base is fudgy and chocolatey, while the cheesecake layer on top is smooth, creamy and tangy.
Mini chocolate chips form the friendly ghost faces, making this dessert as cute as it is tasty. Follow the simple recipe below to make these showstopping Halloween brownies.
Ingredients
For the Brownie Base:
- 1 cup (2 sticks) unsalted butter, melted
- 2 cups granulated sugar
- 1⁄2 cup cocoa powder
- 1⁄2 tsp salt
- 1 tsp vanilla extract
- 4 large eggs
- 1 1⁄4 cups all-purpose flour
For the Cheesecake Layer:
- 16 oz cream cheese, softened at room temperature
- 1⁄2 cup granulated sugar
- 1 tsp vanilla extract
- 2 large eggs
For Decorating:
- Mini chocolate chips
- Black decorating gel
Directions
Prepare the Brownie Base:
- Preheat oven to 350°F. Grease a 9×13 inch baking pan and line with parchment paper, leaving overhang on all sides to easily lift out the finished brownies.
- In a large bowl, whisk together the melted butter and sugar until combined. Add in the cocoa powder, salt and vanilla and whisk until smooth.
- Add the eggs one at a time, whisking after each addition. Then gently fold in the flour just until combined, being careful not to overmix.
- Pour the brownie batter into prepared pan, smoothing evenly. Bake for 20-25 minutes, until a toothpick inserted in the center comes out mostly clean with just a few moist crumbs.
- Allow the brownies to cool completely in the pan set on a wire rack.
Prepare the Cheesecake Layer:
- In a large bowl using a hand mixer, beat the cream cheese until smooth and creamy. Add in sugar and vanilla extract and mix until combined.
- Add the eggs one at a time, mixing slowly after each addition just until incorporated. Do not overbeat.
- Spread the cheesecake mixture evenly over the cooled brownies. Return to the oven and bake for an additional 17-20 minutes.
- Allow to cool completely before decorating.
Decorate the Brownies:
- Arrange mini chocolate chips on the cheesecake layer to form the ghost faces. Use two chips for eyes and a row of chips for the mouths. Feel free to get creative with your ghost designs!
- Use black decorating gel to pipe on arched eyebrows over the eyes to give the ghosts a friendly look.
- Refrigerate brownies for at least 2 hours before cutting and serving. Lift brownies out of pan using parchment overhang and cut into squares.
- Store leftover ghost cheesecake brownies covered in refrigerator for 3-4 days.
Make it Your Own
This recipe is endlessly adaptable to suit your tastes and dietary needs. Here are some easy variation ideas:
- Use salted butter for the brownies and sprinkle flaky sea salt on top for a salty-sweet flavor.
- Make it gluten-free by using your favorite gluten-free flour blend in place of regular flour.
- For richer cheesecake swirl, use mascarpone cheese instead of regular cream cheese.
- Stir 1⁄2 cup peanut butter chips or white chocolate chips into the brownie batter before baking.
- Replace the cocoa powder with carob powder to make a chocolate-free version.
- For a festive fall twist, use pumpkin spice or cinnamon in the cheesecake layer.
- Decorate with candy corn pieces, sprinkles or sanding sugar instead of chocolate chips.
No matter how you choose to decorate or flavor these Halloween brownies, the combination of fudgy brownie base and smooth cheesecake topping can’t be beat!
The step-by-step instructions make putting together this impressive dessert easy. Bring these ghost cheesecake brownies to your next Halloween party for a treat that’s super cute and delicious.
Here are some frequently asked questions and answers for the ghost cheesecake brownies recipe:
FAQ for Ghost Cheesecake Brownies
Q: Can I make the brownie and cheesecake layers ahead of time?
A: Yes! You can bake the brownie base up to 3 days in advance and store airtight at room temperature. The cheesecake layer can be made up to 2 days in advance and stored in the fridge. Assemble and decorate the brownies within a few hours of serving.
Q: What size pan should I use?
A: The recipe is designed for a 9×13 inch baking pan. Adjust the baking time as needed if using a different size pan.
Q: Can I substitute ingredients?
A: Feel free to swap the all-purpose flour for a gluten-free blend. For the cheesecake layer, mascarpone or full-fat ricotta cheese can be substituted for the cream cheese.
Q: My cheesecake layer cracked – what did I do wrong?
A: Cracks happen! To avoid cracks, make sure your cream cheese is fully softened before mixing. Gently fold in the eggs rather than overbeating. And don’t overbake the cheesecake layer.
Q: How should I store leftovers?
A: Cover tightly and store leftover brownies in the fridge for 3-4 days. Let come to room temperature before serving for best texture.
Q: Can I add nuts or chocolate chips to the brownie batter?
A: Absolutely! Mix in 1/2 cup chopped nuts or mini chocolate chips to the batter before baking for a delicious twist.
Q: What’s the difference between cocoa and cacao powder?
A: Cocoa powder has been processed at high heat, while cacao powder is raw and less processed. Use whichever you prefer!
Q: Can I make these gluten free?
A: Yes! Simply swap the regular flour for a gluten-free flour blend in the brownie portion of the recipe.
Q: What’s the best way to cut the brownies neatly?
A: Use a sharp knife wiped clean between each cut. Cut the brownies when completely cool for clean slices. Sawing motions work better than pressing down.


